Meteorino: extend battery life on NodeMCU? Just switch it off
Meteorino is just a simple stand-alone, unmanned, temperature/humidity reporting system. But I would like to share with you all my designing/developing/constructing experience as I am sure I have faced with problems everyone has when trying to set up a generic WiFi sensor meter that should work uninterruptedly 24/7. The results can easily be inherited by any similar project (with NodeMCU or equivalent) when a microcontroller is needed to send data over WiFi during discrete and short intervals per hour.
Parts and Components
- Microcontroller NodeMCU
- DHT22 sensor
- TPL-5110 timer
- Switch
- Capacitors and resistors as reported in the schematics
- 3xAA alkaline batteries
The Problem
 I was in the need to continuously monitor external or indoor temperature/humidity and other related physical quantities (heat index, dew point, battery level) in any place, not counting on an AC electric socket. In this scenario, battery life was an high priority issue and of course the first approach I have dealt with was DeepSleep capability of ESP8266 (which is embedded in NodeMCU).
I was largely disappointed when I first measured NodeMCU’s power consumption in DeepSleep: several tenths of milliAmperes! Main part of that power was used to keep alive the UART, the voltage regulator and the RTC. I couldn’t get rid of the voltage regulator, as I was thinking to power the microcontroller through the VIN pin; on the other hand, removing the UART from the circuit could have been a dangerous action (due to the small size of the components) and I would have preferred to leave the UART functionality on the circuit, in order to eventually update the sketch without problems.
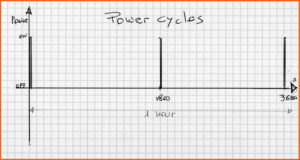
Ultimately, I considered that I needed the NodeMCU working only for few seconds (the time to send data to WiFi, 8 seconds) each 30 minutes: why keeping everything powered forever if I only need it alive for 0.4% of the time (see my Power Cycle drawing)? Here it came the solution.
The Solution
With that kind of power cycle (few seconds per hour) I decided not to pursue the DeepSleep choice anymore, but to SWITCH OFF the circuit. So, I was in the need to build a timer circuit, extremely low-power, able to switch on the NodeMCU, wait for a DONE signal and then switch it off for 30 minutes. While I was trying to reinvent the wheel, I jumped upon the Texas Instruments TPL5110 (download Specifications): a low power timer with an integrated MOSFET driver ideal for power gating in duty cycled or battery powered applications, consuming only 35nA (yes, those are nanoAmperes!).
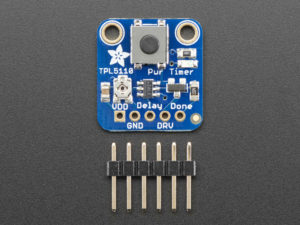
The TPL5110 provides selectable timing intervals from 100ms to 7200s and is designed for power gating applications.
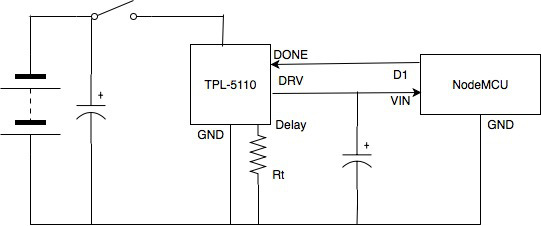
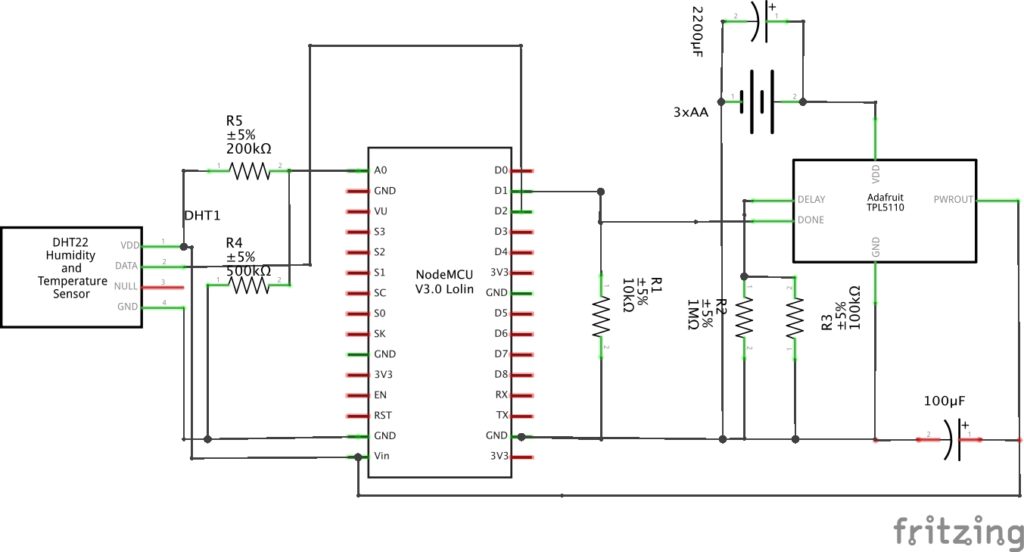
The Adafruit’s breakout board for this components has a led and a trimmer on it, which I have disabled by cutting the two PCB lines on the back. The time interval is set by a resistor (see tables in the specifications datasheet): I chose a parallel of 2 resistors (100kΩ and 1MΩ), which gave me around 29.5 minutes of delay. Once the NodeMCU has finished its cycle, it sends a HIGH signal on the DONE pin of TPL-5110, so to inform it to switch off the power and start counting for 30 minutes.
One issue made me crazy for a week before finding a solution: it seems that TPL-5110 doesn’t like the high current spikes that ESP8266 injects on the power line upon switching on, and it falls into an undetermined state. The first tests don’t work and I was about to abandon this solution as the timer was not supplying the right voltage to the circuit. Then, one day, I connected 2 capacitors: a 2,220µf directly on the battery and a 47µF on TPL-5110 DRV pin. Gotcha! Things started working as they should have, and Meteorino is proudly doing its job since several months.
This is a principle schematic on how to connect the TPL-5110:
Batteries and voltage reading
With the TPL-5110 solution, the system is consuming 80mA for 8 seconds each 30 minutes, and 35nA during the remaining time. The calculations bring to an average current of 350µA, and with these numbers I decided to use 3xAA alkaline batteries (4.5 v or more at full charge) connected to VIN pin of NodeMCU. Considering that at those current rates the microcontroller can operate down to 3.3-3.4 volts, batteries life could reach more than 2 months of continuous operations. I tested several alkaline batteries, and the best choice for me was Duracell Plus Power or Energizer Max. I recommend not to use cheap alkaline batteries, otherwise the life duration can drastically change.
I have also built another Meteorino with a LiFePo4 3.2 cell, connected to the 3V3 pin: that battery is still working at 3.1 volts after 4 months!
Then I came to the battery reading issue. As NodeMCU has an internal ADC available through the A0 pin, I followed the suggestions found on this article; I calculated the calibration LSB number and hard coded it in the sketch. This solution is giving me an acceptable precision on reading (+/- 3mV), so I can check batteries from the cloud, together with the environmental data.
float LSB = 0.0066666667;
The sensor
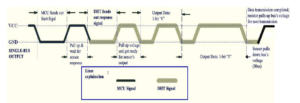
The sensor is a DHT22 (more reliable than its brother DHT11). Using NodeMCU, do NOT include the standard DHT sensor library, but use DHTesp by Mark Ruys. None of the DHT libraries I found were written to work without errors on the ESP32. For ESP32 (a multi core/ multi processing SOC) task switching must be disabled while reading data from the sensor.
ThingSpeak
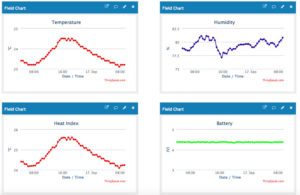
In order to have a constant and historical data report, I used ThingSpeak. It is a free web service that lets you collect and store sensor data in the cloud and develop IoT applications. The ThingSpeak web service provides apps that let you analyze and visualize your data on the browser or on any smartphone.
I will not give instructions on how to enroll and start a channel on ThingSpeak, as it is really trivial. Just point your browser here: https://thingspeak.com/users/sign_up
IFTTT notifications
As Meteorino is working 24/7 from its place (that could be indoor or outdoor), I thought it was nice to have a notification if something went wrong. For this purpose, I used 3 IFTTT webhook services to send me an email when:
- data read from DHT22 is not valid;
- sending data to ThingSpeak fails;
- low battery level
Write your IFTTT API key into the user_config.h file and customize this applet to your needs.
Schematics
Code
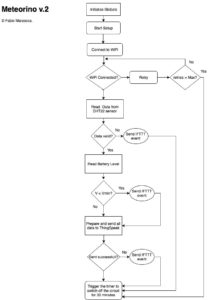
We need to run the device, connect to the WiFi AP, read the sensor, transmit data to ThingSpeak and switch off NodeMCU. So, the sketch run each time the setup and never reaches the loop function. To reduce WiFi connection time, I assigned a static IP to Meteorino (I suggest not to use DHCP, as it will use more battery power). The flowchart is quite self-explanatory: the WiFi connection has a MAX_RETRY constant and if it fails, the device is switched off for a cycle. At the end of the operations, NodeMCU sets D1 to HIGH in order to trigger the off-cycle of TPL-5110.
There are variables you need to set in user_config.h, to fit to your needs:
- IP address and LAN settings;
- WiFi SSID and password
- ThingSPeak write API key and channel number
- IFTTT API key
To ensure triggering of TPL-5110, I put it into a while(1) loop: it doesn’t hurt as if two or more DONE signals are received within the time interval, only the first DONE signal is processed.
 // toggle DONE so TPL knows to cut power!
while (1) {
digitalWrite(DONEPIN, HIGH);
delay(1);
digitalWrite(DONEPIN, LOW);
delay(1);
}
The full code can be downloaded from this link.
Enclosure
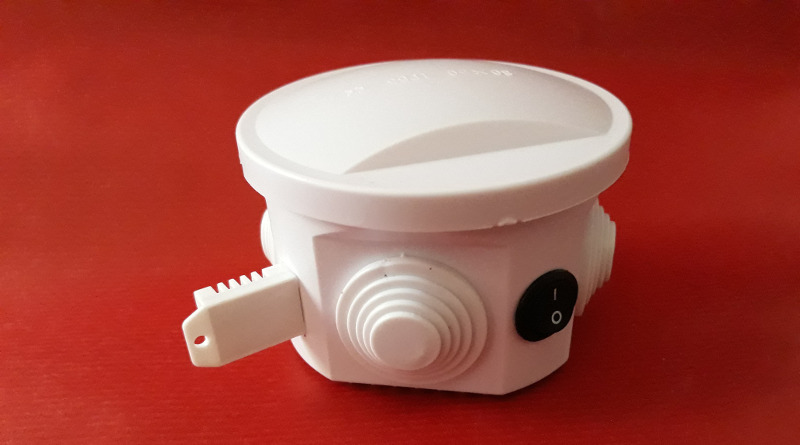
For the box I used a round electrical junction box. It is easy to open and everything fits right in. Meteorino can also be placed in the outside, but do not expose it to direct rain: the box is waterproof but the DHT22 sensor is not.


Bonjour,
Je suis très intéressé par ce montage qui permet de réduire la consommation d’énergie d’une batterie.
Pour ce qui concerne la réalisation je n’ai pas de problème.
Pour ce qui concerne le sketch, lors de la compilation j’ai ce message d’erreur :
#define TS_CHANNEL_NR YOUR_THINGSPEAK_CHANNEL //ThingSpeak Meteorino channel number
Je ne sais pas où trouver channel number?
Est-ce que c’est, ‘’Channel ID: xxxxxx’’ qu’il faut mettre, si oui comment modifier la ligne du sketch ci-dessus ?
Pour le SSID, le Pass et la Key pas de problème car j’ai ouvert un compte sur ThingSpeak.
Merci beaucoup de m’aider.
Cordialement
Jimmy
P.S. Je ne suis pas informaticien
Hello,
I am very interested in this assembly that reduces the energy consumption of a battery.
Regarding the realization I have no problem.
Regarding the sketch, during the compilation I have this error message:
#define TS_CHANNEL_NR YOUR_THINGSPEAK_CHANNEL // ThingSpeak Meteorino channel number
I do not know where to find channel number?
Is it, ” Channel ID: xxxxxx ” that you have to put, if yes how to modify the sketch line above?
For the SSID, the Pass and the Key no problem because I opened an account on ThingSpeak.
Thank you very much for helping me.
Best regards
Jimmy
P.S. I am not computer scientist and sorry for my very poor english
On ThingSpeak you need to create a Channel, where Meteorino will upload its data. Then, once created the Channel, you will see the Channel ID. You can follow this tutorial: https://it.mathworks.com/help/thingspeak/collect-data-in-a-new-channel.html
Hello,
This is the error message
‘YOUR_THINGSPEAK_CHANNEL’ was not declared in this scope
Hello, thank you for your answer.
As I told you, I did exactly what you recommended. In other words, at ThingSpeak I created a channel called Meteorino. I have of course a Channel ID number: (6 digits). On the sketch I entered the API Key, SSID and PASS.
Although everything is well stated, I still have the same error message at this line of the sketch.
#define TS_CHANNEL_NR YOUR_THINGSPEAK_CHANNEL // ThingSpeak Meteorino channel number
My question is, where should this number be declared in your sketch?
Regards
Jimmy
This is the error message
‘YOUR_THINGSPEAK_CHANNEL’ was not declared in this scope
In config.h file, replace YOUR_THINGSPEAK_CHANNEL with your channel number and YOUR_THINGSPEAK WRITE_API_KEY with your API key.
In other words, as an example:
#define TS_WRITE_KEY “TJI36YO75XGCW1OL” //ThingSpeack write API key
#define TS_CHANNEL_NR 41653 //ThingSpeak Meteorino channel number
Hello again,
I would simply like to thank you for your patience.
It works now and I get the information from ThingSpeak.
Thanks again or merci beaucoup and have a nice day or bonne journée!
Jimmy
You’re welcome!
Grazie per aver condiviso questo progetto!